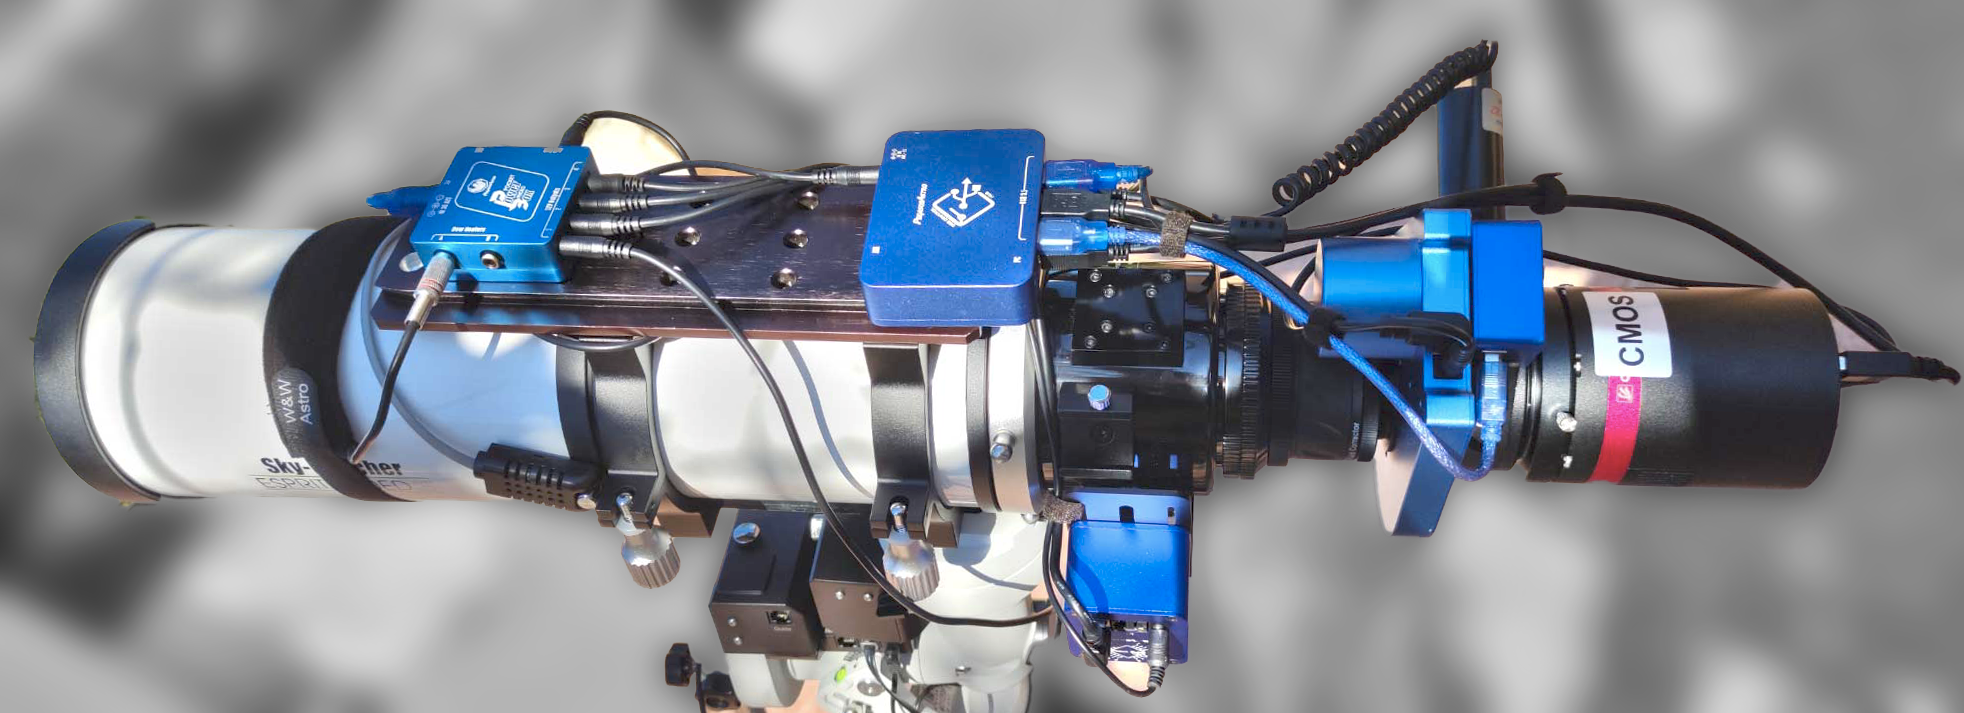
Cable management recommendations
Use a certified and branded power supply unit that can deliver at least 12V DC / 10A.
Higher delivered amperage is indicative of superior quality. A $20, budget-tier 12V/10A power supply is likely to exhibit performance shortcomings such as noise interference, output power below advertised specifications, and significant voltage ripple. It’s a well-established principle that the quality of a product corresponds directly to its price point.
You can check our certified power supply units
Perform a preliminary assessment of your typical current consumption. It’s important to note that power supplies tend to encounter heat-related issues when operating close to their maximum power capacity. As a prudent guideline, opt for a power supply unit (PSU) with a capacity that exceeds your calculated consumption by at least 30%. For instance, if your consumption registers at 7A, selecting a 10A PSU is recommended to ensure optimal performance and reliability.
Use thick and short power cables
Utilize a minimum of an AWG17 input cable capable of accommodating a maximum current load of 10 Amperes. When connecting your devices, it is imperative to employ AWG20 or thicker cables, capable of supporting current loads of up to 5 Amperes. The use of slender and extended cables can induce substantial voltage drops under heavy power loads, resulting in voltage levels dropping below 11.5 Volts. This voltage fluctuation can give rise to a multitude of issues, including but not limited to:
- Mount stall – Insufficient power supply to the mount motors, whether for Right Ascension (RA) or Declination (DEC), can lead to critical operational issues, causing failures in slewing or tracking functions. In some cases, this insufficient power may even result in motor jamming, characterized by unusual noises during operation.
- Camera issues – Numerous CCD/CMOS cameras have been observed to generate undesirable artifacts, including band lines and patterned or random noise, both in light and dark frames when the input voltage falls below the critical threshold of 12.0 Volts. These artifacts may also arise in cases where the quality of the power supply unit (PSU) output is subpar. Additionally, it’s worth noting that inadequate voltage can limit the cooling thermoelectric cooler (TEC) system’s ability to attain its maximum delta temperature, potentially impacting the camera’s performance and image quality.
- Small factor PC unexpected resets – In scenarios where an Intel NUC or a comparably compact form-factor PC is employed, powered by a 12-volt source, the occurrence of intermittent power resets or spontaneous reboots may become evident, particularly during instances when the CPU demands elevated power levels to execute resource-intensive tasks.
When utilizing AC power and converting it to 12V DC, it is strongly advisable to position the AC mains cord in proximity to your pier or mount head, subsequently employing the power supply unit (PSU) for the conversion process from mains voltage to 12V DC.
AC voltage exhibits the capability to traverse extensive distances efficiently. Conversely, DC voltage encounters voltage drops, particularly when transmitted across lengthy pathways, particularly through slender conductors. This principle extends to batteries as well. It is imperative to position the battery in close proximity to your setup. The practice of siting the battery at a distance and relying on extended wire connections to channel power yields unfavorable outcomes.
Notably, this approach leads to substantial power loss and elevates the risk of voltage drop, which can compromise the efficiency of your setup.
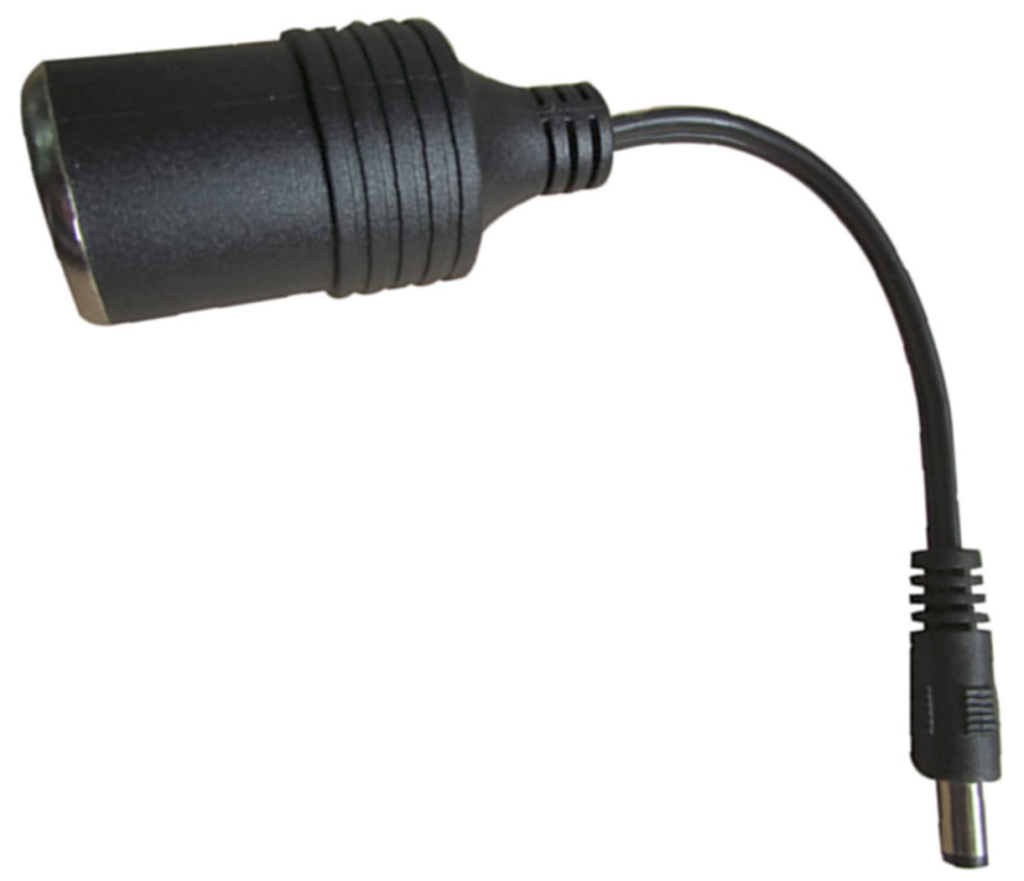
Pay extra attention to the battery adapters
Numerous documented instances highlight the suboptimal internal wiring of certain adapters, as depicted in the image below. Frequently, these adapters employ excessively thin cables, resulting in pronounced voltage drops. It is imperative to verify that the adapter does not introduce a power bottleneck between your battery and your equipment.
Utilizing sufficiently thick cables capable of supporting currents of up to 10 Amperes is essential. It’s worth noting that although some of these adapters may be advertised as accommodating up to 15 Amperes, practical experience often reveals that their actual capacity seldom exceeds 5 to 6 Amperes at most.
Check your battery type and its capacity
Deep Cycle Batteries
When opting for a battery as your power source, it is advisable to select a “deep cycle battery.” These batteries are specifically engineered to endure regular and substantial discharge, utilizing most of their capacity without incurring damage or compromising their longevity.

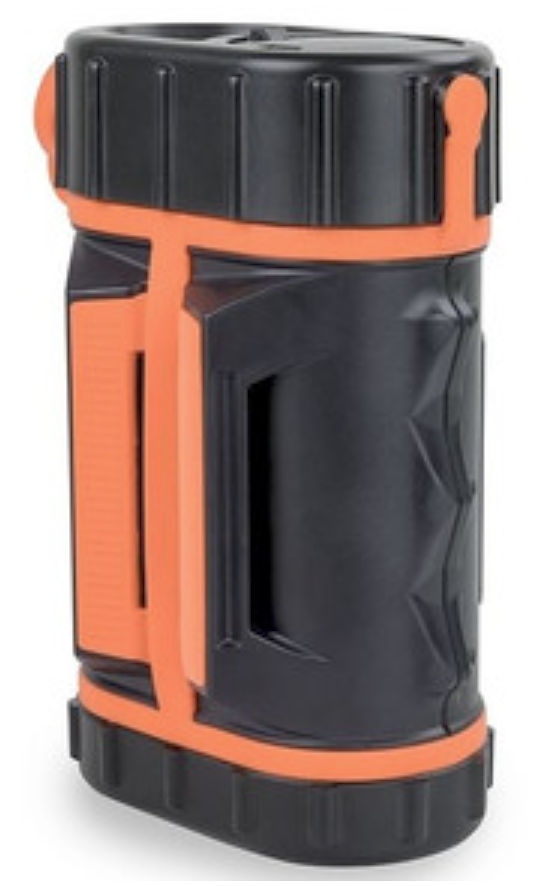
A typical AGM deep cycle battery
Car Lead Acid batteries are not well-suited for astrophotography applications. These batteries are engineered for short bursts of high current, primarily for engine ignition. Using them for prolonged periods, especially when the battery’s charge level falls below 50%, can lead to significant capacity degradation and eventual failure. Car batteries are not designed to sustain continuous power supply over extended durations, making them an unsuitable choice for powering your astro-setup.
There is also the option of the new LiFePo batteries but there are lots of constrains here.
One of the primary advantages of LiFePo batteries is their lightweight and compact size when compared to traditional AGM deep cycle batteries. Additionally, LiFePO4 batteries offer a remarkable shelf life of up to 10 years without recharging, far surpassing the 3-year shelf life of Lithium-Ion batteries and the 6-9 months of Sealed Lead-Acid batteries. However, it’s important to note that the major drawback of these batteries is their considerably high price point. A 50AH LiFePO4 battery can cost approximately $450 to $500, significantly more expensive than an equivalently sized deep cycle battery, which typically ranges from $80 to $100.
Most portable LiFePo powertanks have a 160Wh capacity. This means 160Wh / 12V = about 13AH (Amp/hours).
Please note that this capacity is very low for a standar astrophotography setup
Below is a general description of a typical astrophotographic setup involving a 4-inch refractor telescope, along with a rough analysis of its power consumption:
Telescope and Mount: The 4-inch refractor telescope and equatorial mount typically consume a modest amount of power, usually within the range of 1-2 amps.
Camera: Astrophotography cameras can vary significantly in power consumption, but a rough estimate for a cooled camera might be around 2-3 amps, depending on the cooling system and exposure settings.
Accessories: Power requirements for accessories like guiding scopes, autoguiders, dew heaters, and filter wheels can add an additional 1-2 amps, depending on the specific equipment and usage.
Laptop/Control Computer: The laptop or control computer used for camera and mount control typically draws a few amps.
Overall Total: In total, a typical astrophotographic setup like this might require approximately 6-8 amps of current at 12 volts, depending on the specific equipment and usage.
It’s essential to calculate the actual power consumption of your setup based on the specifications of your individual components and how you plan to use them. Additionally, consider the capacity and runtime of your power source, whether it’s a battery or an external power supply, to ensure uninterrupted imaging sessions.
Your best case scenario:
| Device | Current |
| Cooled CMOS/CCD Camera | 2.5 Amps (cooling power to 80%) |
| Equatorial Mount (e.g EQ6R-Pro) | 1 Amp (during tracking) |
| 1 x Dew Heater (4”) | 1 Amp |
| Guiding Camera / USB Hub / Focus Motor / etc | 0.3A (average) |
| Small Factor PC (E.g Intel NUC i3) | 1.5A (average) |
| TOTAL | 6.3 Amps |
In the best-case scenario where your LiFePO4 battery has a capacity of 12Ah and your equipment consumes 6.3 amps, you can expect the battery to power your equipment for approximately 1.9 hours. This calculation provides an estimate of the continuous runtime before the battery is fully depleted. However, actual battery performance may vary based on factors such as the battery’s state of charge, temperature, and discharge rate. It’s essential to monitor your battery’s status during operation and have a backup power plan in place for longer astrophotography sessions.
A LiFePo4 battery with 159Wh means 159W / 13Volts = 12Amp/hours – Usually these batteries are only suitable to power on an eq mount and nothing else.
* For a 6h astrophotography session) you will need ar least a 6.3 * 6 = 38AH battery
* You usually need a larger capacity battery as battery should not have been entirely drained out!
A 100AH deep cycle battery can easily provide the power you need for up to 3 nights
LiFePo4 power stations
These advanced power stations are equipped with a substantial array of LiFePO4 batteries, offering a multitude of advantages over conventional Lead Acid (Car) Batteries. Notably, these benefits include an extended operational lifespan, hassle-free maintenance, exceptional safety features, a lightweight design, and notable improvements in discharge and charge efficiency.
However, it’s worth acknowledging their primary drawback: a considerably high cost. A power tank with a 500Wh capacity, for instance, typically commands a price point of approximately $500.
These LiFePO4-based power stations operate at an output voltage of 13 Volts and possess the noteworthy capability of simultaneous recharging while powering your equipment. Furthermore, they serve a dual purpose by functioning as uninterruptible power supplies (UPS) when paired with outdoor fuel generators or alternative power sources, offering a reliable backup solution to mitigate potential disruptions in power supply.
The 500Wh capacity equates to a substantial 41 Amp-hours, as calculated using the formula 500Wh / 13V, and based on the power consumption estimates for a typical astrophotographic setup, this battery tank can reliably sustain your equipment for approximately 6 hours, assuming a consumption rate close to 6 Amperes. While this duration may appear relatively short, it’s essential to consider that these LiFePO4-based power tanks offer a level of performance that rivals much bulkier and expensive lead acid batteries, which can cost upwards of $2500.
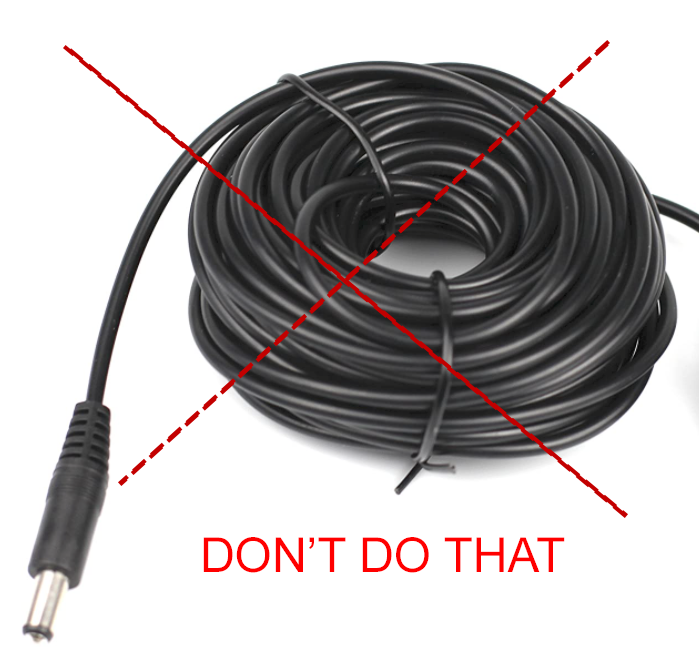
Avoid coiling power wires
Avoid creating coiled loops in power wires. Coils in power wires can induce electromagnetic interference (EMI) and adversely impact signal integrity and electrical performance. It is advisable to route and manage power wires in a manner that minimizes the risk of unintended interference and ensures optimal power transmission.
Do not loop dew strap cables
Same applies here. To prevent issues with dew strap cables, it is advisable to avoid creating loops or coils in them. Coiled or looped dew strap cables can potentially lead to interference and hinder their effectiveness in preventing dew buildup on optical surfaces. Instead, route and manage dew strap cables in a manner that ensures they remain straight and free of knots or loops, optimizing their performance in keeping optics clear of moisture.

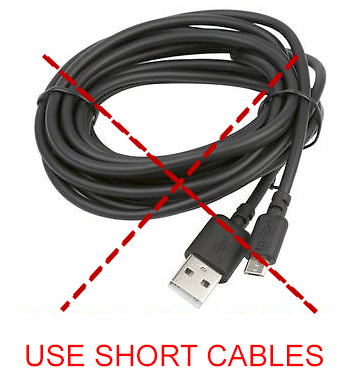
Do not loop USB cables
Looping or coiling USB cables should be avoided to maintain reliable data transfer and power delivery. Coiled USB cables can introduce signal interference and electrical impedance issues, potentially leading to data transfer errors or unstable connections. When managing USB cables, it’s best to keep them straight or use gentle bends to minimize the risk of signal degradation and ensure consistent performance.
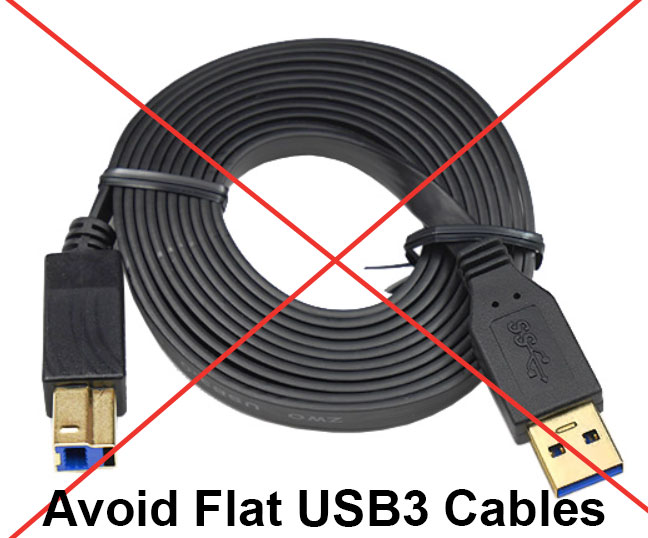
Do not use flat USB3 cables!
Flat USB and especially USB 3.0 cables are advised against for the reasons below:
Signal Integrity: USB 3.0 cables are designed to carry data at high speeds, and they have multiple wires for transmitting data, power, and grounding. In flat cables, these wires are often placed close together, which can lead to signal interference and reduce the quality of the connection. This interference can result in slower data transfer rates, connectivity issues, and data corruption.
Limited Durability: Flat USB 3.0 cables tend to be less durable than their round counterparts. The flat design can make them more prone to damage from bending, twisting, and physical stress. This can lead to cable failures and the need for replacement more frequently.
Compatibility Issues: Some devices and ports may not work well with flat USB 3.0 cables due to the signal interference and other technical issues. This can result in compatibility problems that can be frustrating to troubleshoot.
Signal Loss over Length: Over longer distances, flat USB 3.0 cables are more likely to experience signal loss than round cables, which can lead to data transfer problems.
Lack of Standardization: Flat USB 3.0 cables are not as standardized as round cables, and there can be variations in the quality and performance of different flat cable designs.
Distant power from USB cables
To maintain optimal performance and minimize potential interference issues, it is advisable to separate power and USB cables. Keeping power cables separate from USB cables can help reduce electromagnetic interference (EMI) and ensure reliable data transfer and power delivery. This practice is particularly important in scenarios where signal integrity and power quality are crucial, such as in sensitive electronic setups or data transmission applications.
When managing your cables, remember to not only separate power from USB cables but also invest in good-quality cables. Using high-quality cables can further enhance signal integrity, power delivery, and overall reliability in your setup. Avoid low-quality or poorly shielded cables, as they can introduce interference and compromise the performance of your devices. Prioritizing good-quality cables is essential for maintaining a stable and efficient system.
Use Ferrite Chokes: Add ferrite chokes to cables to reduce electromagnetic interference.

Pay attention to USB maximum cable length
USB 2.0 devices have a maximum recommended cable length of 5 meters or approximately 16 feet, while USB 3.0 can extend up to 3 meters or around 10 feet. However, it’s advisable to err on the side of caution and use even shorter cables in practice. Striving to stay well below the maximum cable length limits is a wise approach.
Using cables that are significantly shorter than the maximum specified length helps prevent potential issues such as USB random disconnects or the inability of USB devices to establish a stable connection with your PC. Maintaining a conservative cable length approach is essential for ensuring consistent and reliable USB device performance in your setup.

Humidity, particularly in conjunction with low temperatures, can gradually deteriorate the quality of USB cables over time. Numerous reports have highlighted instances where long USB cables initially operated without issue but developed problems such as random USB connectivity disconnects or packet losses after prolonged exposure to high humidity conditions.
It’s worth noting that the USB3 protocol is inherently more complex compared to USB2. With its higher bandwidth, increased transfer speeds, and stricter technical requirements, USB3 demands higher-quality cables and a deeper understanding of designing reliable and certified USB3 devices. This underscores the importance of not only selecting quality cables but also ensuring they are suitable for the specific requirements of USB3 devices and environments where humidity and temperature variations can play a significant role in cable performance.
Avoid using internal USB Hub of Cmos cameras
The USB hub implementation in many of these CMOS cameras exhibits significant design flaws that compromise USB-IF Compliance. One of the most critical issues is the presence of a non-powered dual-port USB hub. When using a 3-meter USB3 cable for the main camera and a 2-meter USB cable for the guiding camera, the total cable length reaches 5 meters (16 feet). Since the camera’s hub lacks power, this setup can result in severe USB communication problems, including frequent random disconnects, and sometimes the guiding camera may not be detected at all.
To address this issue, there are two recommended solutions:
a) Utilize USB cables with the shortest possible lengths to minimize the total cable length.
b) Invest in a high-quality powered USB hub and bypass the use of the built-in dual USB hub in the camera entirely. This can significantly improve the stability and reliability of USB communication in your setup, especially when working with longer cable runs.
Don’t mix 2.4GHz Wi-Fi and USB3 devices.
USB 3.0, also known as SuperSpeed USB, employs broadband signaling that can potentially introduce electromagnetic interference (EMI). This interference can have a significant impact on the performance of nearby cellular, Bluetooth, and 2.4GHz Wi-Fi devices, degrading their functionality.
For more in-depth information on this topic, you can refer to Intel’s whitepaper, which may provide specific insights into USB 3.0 interference and strategies to mitigate its effects on wireless and cellular communications. It’s essential to be aware of these potential interference issues when setting up USB 3.0 devices in proximity to other wireless communication systems to ensure optimal performance across all devices.
It’s a prudent recommendation to be aware that many USB 3.0 devices can indeed generate radio interference within the 2.4GHz frequency range, which is commonly used by Wi-Fi and Bluetooth. This interference can potentially disrupt the performance of these wireless communication technologies.
To mitigate the impact of this interference, it’s strongly advised to consider disabling the 2.4GHz Wi-Fi band and using only the 5GHz band (802.11a) for your wireless communication needs. This can help ensure a cleaner and more reliable wireless environment, especially when using USB 3.0 devices in close proximity to Wi-Fi and Bluetooth connections.
Use USB extenders cautiously.
USB extenders can indeed introduce compatibility issues between USB hubs and cables. While we do not recommend the use of USB extenders, if you decide to go this route, it’s crucial to select a reputable and well-known branded USB active extender. High-quality extenders are more likely to provide reliable and consistent performance, ensuring that your USB devices work seamlessly. As the saying goes, “You get what you pay for,” so investing in a trusted brand can help avoid potential headaches associated with compatibility and performance issues.
Choose Quality: Opt for high-quality, reputable USB extenders from known brands. These are more likely to offer reliable performance.
Shorter Lengths: Whenever possible, use shorter USB extender cables to minimize the overall cable length, reducing the risk of signal degradation.
Power Considerations: Ensure that your USB devices receive adequate power through the extender. Some USB extenders come with power options to maintain proper voltage levels.
Test Thoroughly: Before relying on USB extenders for critical operations, thoroughly test your setup to ensure that all devices function reliably.
Monitor for Issues: Continuously monitor your extended USB connections for any signs of signal loss, disconnection, or performance issues.
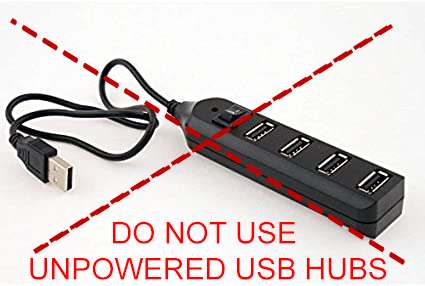
Opt for a trusted, powered USB hub.
It’s a valuable point to note that USB hubs without the option for external power can struggle to maintain the stability of multiple connected USB devices, particularly when dealing with USB cables longer than 2 meters. This limitation is due to the hub’s reliance solely on the power supplied by the host device (such as a computer or laptop), which may not provide sufficient power to keep all connected devices operating reliably.
To ensure the stability of multiple USB devices, especially in setups with longer cables, it is advisable to use powered USB hubs. These hubs have their own power source and can provide ample power to all connected devices, reducing the risk of instability, signal loss, or disconnections. When using longer USB cables or numerous USB devices, opting for powered hubs can significantly improve the overall performance and reliability of your setup.
Invest on an industrial powered USB2 or USB3 Hub
USB hubs, which typically spans from 0°C to +60°C. These hubs are indeed designed for indoor use within a controlled environment, not for the rigors of outdoor astrophotography in harsh winter conditions.
In astrophotography setups where low temperatures are a concern, investing in an industrial-grade USB hub that is certified to operate under extreme temperature conditions is advisable. Such hubs are engineered to withstand the challenges of cold weather, providing enhanced stability and performance, which can help mitigate the risk of USB disconnects or failures during astrophotography sessions conducted in suboptimal weather conditions.

A decent cable management example can be seen at the image below. Short USB and power cables, no cable loops. Pocket Powerbox Micro does the power distribution. USB Control Hub gathers all USB devices.